
Dell EMC IDPA : How to Deploy
- Abhishek Shukla

- Aug 14, 2020
- 3 min read
In my previous article of IDPA, I spoke about the high-level introduction of the product and its components. Also, I introducted different models of IDPA which is DP4xxx, DP5xxx and DP8xxx series with their different sizes. I mentioned how these models are different from each other w.r.t the components they have like DP4xxx has Avamar Virtual Edition (AVE) and Data Domain Virtual Edition (DDVE), DP5xxx has physical Data Domain and Avamar Virtual Edition and DP8xxx models have a physical Data Domain and Avamar component.
Through this article, I will take you to journey of deployment of IDPA. DP5xxx and DP8xxx are not in scope, so I chose DP4400 as model for showcase the deployment.
IDPA DP4400 is the model which is a converged virtual appliance. It is fully integrated with components of IDPA models into single 2U node and is faster to deploy. It is group of various components like AVE, DDVE, VCSA(VMware vCenter Server Appliance), ESXi host, IDPA system manager etc.
Abbrevations:
IPDA: Integrated Data Protection Appliance
ACM : Appliance Configuration Manager
AVE: Avamar Virtual Edition
DDVE: Data Domain virtual Edition
CDRA : Cloud Disaster Recovery Appliance
DPA: Data Protection Advisor
DPS: Data Protection Search
Network Setup
There are number of components which get installed within IDPA and require IP addressing. This IP addressing can be static or can be assigned as a range. Using "IP Range" is preferred method as if reduces the chance of errors. To get IDPA installed, minimum 13 IPs are recommended. One is for ESXi host and one is for ACM and rest 11 IPs are for the components. Since this is lab set up, you can have 7 IPs.
Main components which require IP addresses
vCenter
Backup Server (AVE)
Protection Storage (Management IP)
IDPA System Manager
DPA for Reporting and Analytics Optional)
Search (Optional)
Cloud Disaster Recovery (Optional)
ACM Setup
ACM is the one which would deploy IDPA. ACM set up in one time process and configured initially. When IDPA is shipped, it is accessible with default IP address
https://192.168.100.100:8543 with default 'root' credentials. When you connect IDPA device using default IP, you have this landing page

Once you enter the default password, it prompts you to change the password. The initial configuration allows you to provide the production/customer network details which includes IP address of ACM (customer's network), subnet mask, DNS and IP address of ESXi host.

now, after entering the details, ACM creates network configuration. Click on finish once done.

Hence ACM set up is complete and now you login with new IP address (set for ACM IP) with new password you set for "root"
Components Setup
The ACM is setup with new IP, Login with new root credentials. ACM is responisble to deploythe appliance that involves basic network information for configuring components. Once logged in, you land at welcome page which is basically a menu page. Left pane tells about the components which are required to configured starting from "Welcome" to "Summary". Lets go one by one.
Welcome page

this is the first page where you can see the components to be installed . The highlighted ones are mandatory and others are optional
Mandatory Components
Data Domain
Avamar
IDPA system manager
Optional Components
DPA ( Reporting and Analytics)
DPS (Search)
CDRA (Cloud Tiering)
General Settings
Before you start configuring, you have to have license for each component i.e. Protection Storage (Data Domain), Backup server (Avamar) and Reporting and Analytics (DPA).
Once licenses are put, few general settings like Serial Number of appliance, time zone and network setting is required. Provide the customer information and summarize the details you put for IP addresses, names etc and submit. You see below page

Note : The networking setup asks if you need to provide the IP range or you want to give IP manually and give subnet mask and validate
Once the deployment is finished successfully, without any errors, it prompts to login through ACM and login with with root credentials and you see below UI
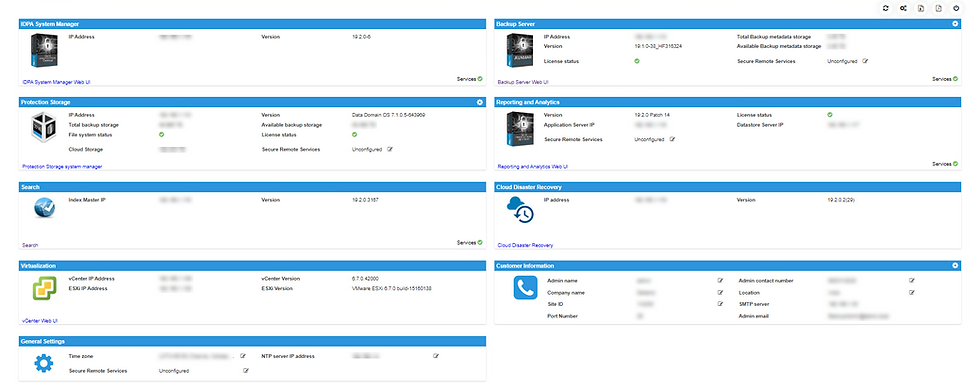
Hence you have several components installed and they tell about IP addressing with their respective versions. Note that you have UI link provided with each component. When you click on the link, it takes you to the UI of that component for example, if you click on IDPA system manager web UI, it takes you to below UI

This summarizes the deployment of IDPA. Hope this was easy and informative for you. I am working on setting up vCenter and I will show you how to configure protection of VMware workloads with IDPA including backup and recovery process. Till then have fun and keep rocking.
Happy Reading !
Related Articles:


Comments